|
|||||||||||||||||||||||||
|
|
Sources of Error In Measuring Apex Offset On APC Connectors
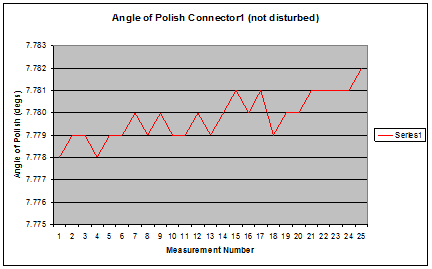
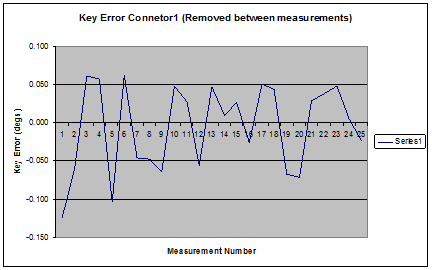
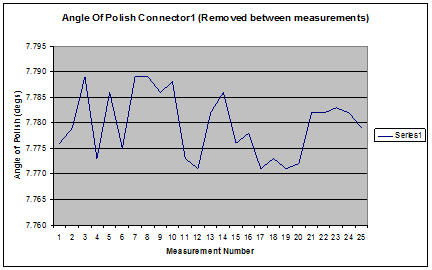
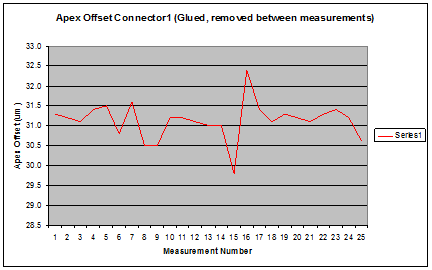
The purpose of this paper is to raise awareness and to encourage discussion on the sources of poor repeatability of apex offset in APC connectors. A measurement system has to be repeatable in order for any calibration using known artifacts to have any value. Apex offset is a combination of angle of the polish and error in the key. To determine where the variability lies it is beneficial to look at these 2 components of apex offset separately. The two sources of measurement variation are the part under test and the equipment used to make those tests. Possible variability on the equipment leading to poor apex repeatability could be the tolerance in the plate used to key the connector and any wear on the fixture holding the ferrule. Possible variability due to the part would be tolerance on the key width (the study used FC/APC with narrow keys) and the degree of freedom between the back hub of the ferrule and the FC/APC housing resulting in a small ferrule rotation that can change the apex offset of an APC connector. The apex offset position is set during the polishing process. Generally speaking, ferrules have a chamfer around the endface that is symmetric with the axis of the ferrule. However, when polished at 8 degrees, the apex of the polished area changes with respect to the fiber core. As more material is removed during polishing, the surface of the endface becomes relatively larger on one side, moving the center of the ferrule endface to one side and away from the ferrule axis. All APC connectors are designed to enable the ferrule to float within the connector housing. This float is necessary because the ferrule is spring-loaded towards the front of the connector to ensure proper mating. The down side is that the float can allow the ferrule to rotate about the axis of the ferrule and with respect to the connector key. Even the smallest rotation can lead to a change in apex offset. The ferrule rotation within the connector can occur by simply cleaning the connector or by the act of simply removing a dust cap. The following series of graphs show repeatability studies for the following conditions. 1 Connector1 not moved � Baseline for Interferometer repeatability 2 Connector1 removed and re-inserted � Combination of tolerances of key width on connector, repeatability of fixture holding the ferrule and degrees of rotation between the ferrule and outer key. 3 Connector1 glued in position to eliminate internal rotation of ferrule relative to key, the connector was removed and re-inserted between measurements � Combination of tolerance of the key on the connector and the key width of the adapter plate plus repeatability of fixture holding the ferrule. 4 Connector2 from different manufacturer removed and inserted between measurements. Connector1 Not Moved During Measurements
Connector1 Removed During Measurements
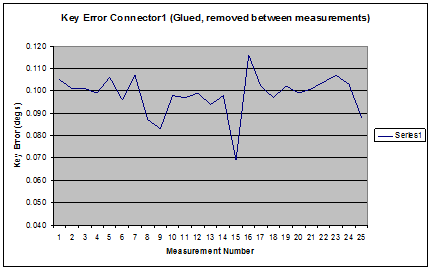
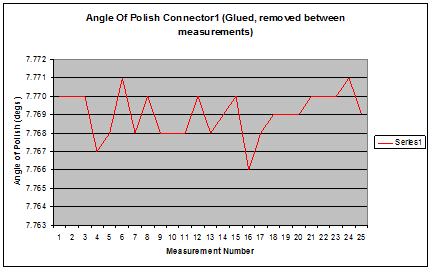
Connector1 Ferrule Glued and Removed During Measurements
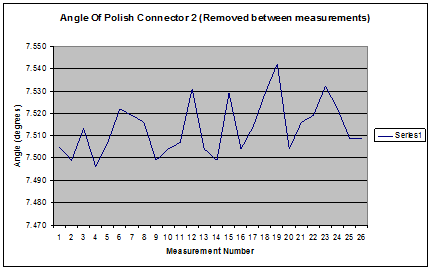
Connector2 Removed During Measurements
Conclusions It is clear from comparing these 2 connectors from different manufactures that there are different tolerances on the key width and the key slot on the inner hub of the ferrule. In the case of connector 2 it is clear that the variability in the apex is due to the error in the key as the 2 graphs track each other very clearly. Connector1 has a tolerance on the key width that is similar to the APC plate used on the equipment. Once connector1 was glued in place to stop the ferrule floating the graphs clearly show that the difference in measurements are purely due to small movements of the key in the plate used to key the connector. Again the key error graph closely tracks the apex offset graph. Angle of polish is very repeatable and does not seem to be a source of apex variation. Tolerances in the connector appear to be a major issue in apex repeatability for APC connectors. The floating ferrule design will also lead to large differences in key error (apex offset) if the ferrule does not assume the same position relative to the key on the outer housing after being mated, polished or cleaned.
|
||||||||||||||||||||||||
|
|
|||||||||||||||||||||||||


